Shriek!!!
My Gelli Plate has arrived!!
If you haven't heard about the new art product in town...
the Gelli Printing Plate used for monoprinting...
you have not been blog hopping. Everyone is giving it
rave reviews and creating some pretty awesome art prints. I can't wait to
get started but first let me explain that you don't have to use the
Gelli Printing Plate which is a hefty $29.00 plus shipping for the
larger 8"x10" plate. You could make your
own by using Knox unflavored gelatin and water.
There are plenty of recipes and You-Tube videos on the
internet so I won't go over them here but I will say that
you do have that option.
I chose not to go the gelatin route because it would take a little
forethought to make the plate beforehand and I know that I probably
wouldn't do it. Also, the gelatin only lasts for up to two weeks and
would take space the refrigerator. Which I don't have!
So, I opted to buy the Gelli Printing Plate which will be ready and
available whenever I have the urge to play!
The BEST tutorial for using the Gelli Printing Plate is the
Gelli web site:
http://gelliarts.blogspot.com.
Joan Bess who hosts the site is simply amaaaaazing!! She pretty much
covers it all...she uses stencils and masks, purchased rubber stamps
and homemade moldable rubber stamps, and found objects.
She shows how to enhance the print afterward by using dyes, inks, acrylic
glazes and watercolor as a tint. This lady has loads of ideas and creates the
most unbelievably gorgeous prints using techniques you
would never have dreamed of! Also, did you know that you can use
the Gelli Printing Plate to print fabric too?
Shriek!!!
Yes, you can even print FABRIC!
Think of the possibilities!!!!
OK, let me show you some of my first attempts using a Gelli plate and what I have learned thus far. For this first print I used three colors of soft bodied Liquitex acrylic paints and printed them in this order: Light Blue Violet, Indian Yellow and Deep Magenta. (Any soft bodied acrylic paint or craft paint will do.) I fully covered the plate with paint for each printing and used stamps, stencils and flower masks for each. Also, I fully cleaned the plate with water and a baby wipe between printings but I didn't always clean the roller, stencils or masks. Most of the time the paint was dry and wouldn't transfer to the plate anyway.
This first print taught me that too much of a good thing can muddy the pot! I did too much mark making and stenciling with each layer and lost much of the detail. You can't even see the letter stencil through all the layers! And....I had such high hopes! Oh well.....this will make a nice journal page once I start adding to it.

I have to say.....it takes a little forethought to decide in which order to layer the colors and when to apply the masks. For example; If you use a light color for the first printing and then use a darker color and mask for the second printing, the area masked will be the lightest color. If you did the reverse and used the darkest color for the first printing and applied a lighter color and mask for the second printing, the masked area would be the darker color. So think about how the different colors and layers are going to work together and when to apply a mask if you are using one. The process does have its surprises but you can manipulate the effect with some planning.
For my next attempts, I eased up a little on the mark making and stencils and even tried strategically applying the paint to specific areas and not the whole plate.
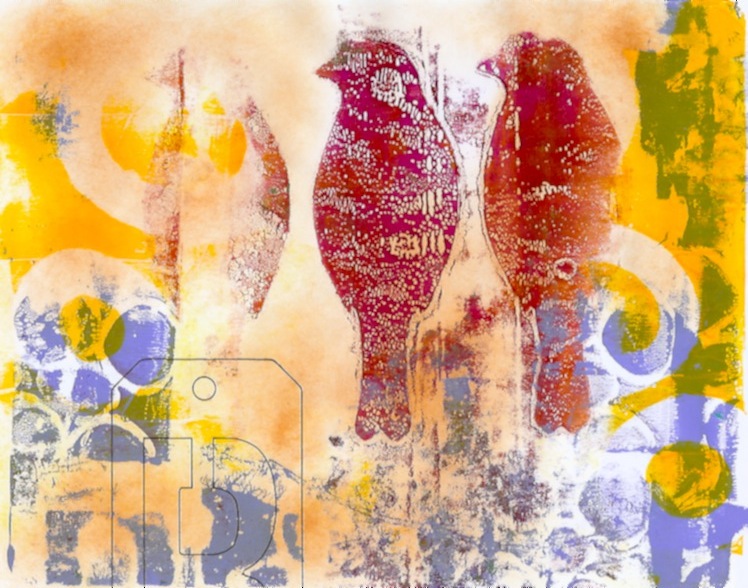
This next print was made by loading up the entire plate with color for the first two printings using India Yellow and then Bright Aqua Green. I went a little easy on the stencils and mark making this time. For the third printing I rolled the deep Magenta color only in the area of the birds, applied the bird masks, a funky ribbon and made a print. There was paint left on the plate so I removed the bird masks and made a ghost print by using a clean sheet of paper and rubbing it over the plate. I put this aside for use later. I decided the print wasn't finished so I rolled the Light Blue Violet paint in select areas, used a circle stencil to remove some paint and printed for a fourth time. Do you see what I mean about manipulating the print with some planning?

This is the ghost print made from the previous print. After the birds, I printed the blue areas using stencils and masks and then printed the yellow area just using masks. I started to embellish this by adding Ranger Distress ink (you could use pan pastels) to the background to soften some of the white areas and then added the inked outline of a "B" stencil. See how different the ghost print is from the original? It's all in the order of how the paint and masks are applied. Two completely different looks!
Here are a few more mono prints using the same colors but in a different order. The first one is the original and the one that follows is the ghost print. I think that I like the ghost prints better. What do you think?
Look at all the delicious texture that is created by the Gelli Printing Plate.
Don't you just love it?
Till next time......
Ginny